7.3 KiB
🌟 NetBox & cEOS VXLAN Fabric Cookbook 🌟
Warning
Work in progress
📚 Introduction
This cookbook guides you through setting up a VXLAN fabric using NetBox for configuration management and cEOS for network virtualization. Perfect for demonstrating NetBox's capabilities with RenderConfig to generate a complete fabric configuration.
🛠️ Prepare Data
📋 Populate NetBox
- Generate a NetBox token via the web UI
- Execute the Python script to import your device models:
uv run import.py http://localhost:8080 YOUR_TOKEN Devices/devices_model.yml
🏗️ Create Fabric
Run the fabric creation script:
uv run Create_Fabric/main.py
NetBox URL: http://localhost:8080
NetBox API Token:
Number of buildings (1-5): 4
Spine device type slug: ceos
Leaf device type slug: ceos
Access switch device type slug: ceos

Existing Sites:
  1. Paris (slug=paris)
Choose site number or 'new': 1
🔍 View Topology
Using the Topology View plugin:
- Navigate to Topology View > Topology
- Click on 'filter' and enable:
- ✅ Show Circuit Terminations
- ✅ Show Cables
- ✅ Group Sites
- ✅ Group Locations
- ✅ Node Label Item: Device Name

👥 Add Customer
❯ uv run Create_Fabric/add_customers.py
Enter NetBox URL: http://localhost:8080
Enter NetBox API Token: 4e58e40e6b19d7f6cc53ae5665ca7ddd00558e71
Enter Customer Name: Orange
Enter VLAN ID (1-4094): 10
Enter VNI ID: 10010

Available Locations:
0: PA1
1: PA2
2: PA3
3: PA4
Select locations (comma-separated indices): 0,2

❯ uv run Create_Fabric/add_customers.py
Enter NetBox URL: http://localhost:8080
Enter NetBox API Token: 4e58e40e6b19d7f6cc53ae5665ca7ddd00558e71
Enter Customer Name: Purple
Enter VLAN ID (1-4094): 10
Enter VNI ID: 10010

Available Locations:
0: PA1
1: PA2
2: PA3
3: PA4
Select locations (comma-separated indices): 1,3
📝 Apply Templates
📤 Import Templates to NetBox
- Go to Operation > Data Sources > +Add
- Configure:
- Name: Templates
- Type: Local
- URL: /tmp/templates
- Click on Sync

📋 Create Config Templates
Create 3 templates in Provisioning > Config Templates:
- Name: Spine
- Data Source: Templates
- File: spine.j2
- Name: Leaf
- Data Source: Templates
- File: leaf.j2
- Name: Access
- Data Source: Templates
- File: access.j2

When complete, you should see:

🔄 Reconfigure Devices
- Go to Devices > Devices
- Filter by role:
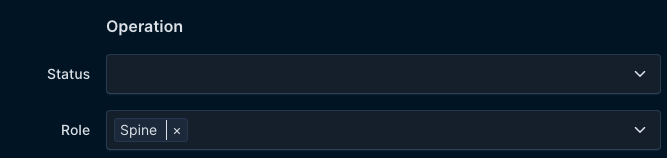
- Select all and Edit Selected:
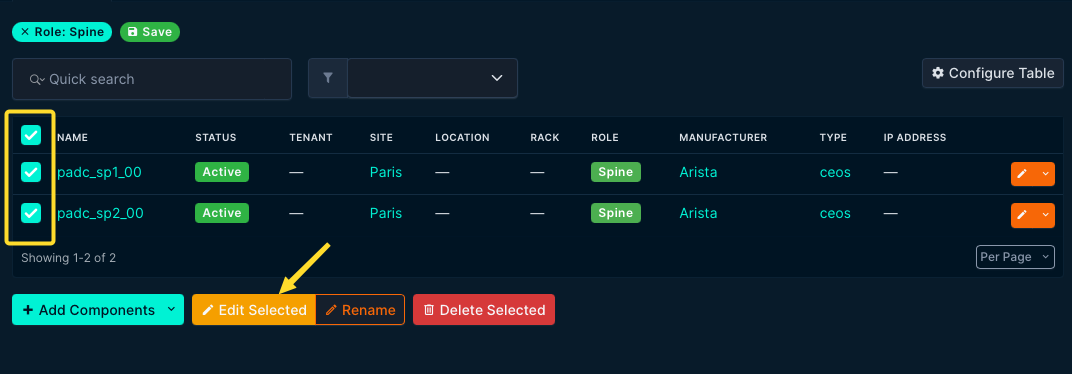
- In the configuration part, select the matching Config Template for the device role:

- Repeat for all three roles: Spine, Leaf, and Access


Now you can view configurations via Render Config: Devices > Devices > Render Config

🚀 Deploy NetLab
Deploy a containerlab environment to validate your configuration:
cd containerlab
❯ clab deploy -t fabric_vxlan.yml
You should see output showing all your devices running:
╭───────────────────────────────┬───────────────┬─────────┬────────────────╮
│              Name             │   Kind/Image  │  State  │ IPv4/6 Address │
├───────────────────────────────┼───────────────┼─────────┼────────────────┤
│ clab-vxlan_fabric-host1       │ linux         │ running │ 172.20.20.21   │
│                               │ alpine:latest │         │ N/A            │
...
│ clab-vxlan_fabric-padc_sp2_00 │ ceos          │ running │ 172.20.20.11   │
│                               │ ceos:4.33.2F  │         │ N/A            │
╰───────────────────────────────┴───────────────┴─────────┴────────────────╯
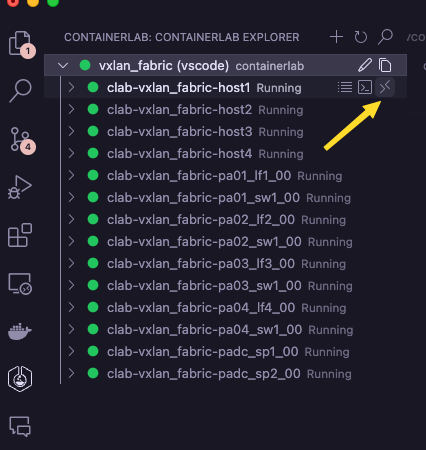
📊 View Lab Topology
Using the VSCode Containerlab extension:
- Open Containerlab panel
- Right-click and select "Graph Lab (TopoViewer)"

⚙️ Deploy Configuration
Currently, you need to manually apply configurations:
-
Use the VSCode extension to "Connect to SSH" for each device
-
Login credentials:
- Username: admin
- Password: admin
- Remember to enter "en" for enable mode and "conf t" for configuration mode
-
Copy/paste the rendered configuration from NetBox

🔍 Validate Configuration
Check BGP, EVPN, and VXLAN configuration:
pa01_lf1_00(config)#show bgp summary
BGP summary information for VRF default
Router identifier 192.168.100.2, local AS number 65101
Neighbor               AS Session State AFI/SAFI                AFI/SAFI State   NLRI Rcd   NLRI Acc
------------- ----------- ------------- ----------------------- -------------- ---------- ----------
172.16.0.1          65001 Established   IPv4 Unicast            Negotiated              3          3
...

pa01_lf1_00(config)#show bgp evpn
BGP routing table information for VRF default
...
🔌 Enable Host Interfaces
Connect to each host and enable eth1:
ifup eth1
Check VXLAN address table on leaf devices:
pa01_lf1_00#show vxlan address-table
          Vxlan Mac Address Table
----------------------------------------------------------------------
VLAN  Mac Address     Type      Prt  VTEP             Moves   Last Move
----  -----------     ----      ---  ----             -----   ---------
  10  aac1.ab60.2c6b  EVPN      Vx1  192.168.100.4    1       0:04:23 ago
Total Remote Mac Addresses for this criterion: 1
✅ Validate Connectivity
Two customers should be configured:
-
🟠 Orange
- Subnet: 10.0.0.0/24
- Hosts:
- PA1: 10.0.0.10
- PA3: 10.0.0.20
-
🟣 Purple
- Subnet: 10.0.1.0/24
- Hosts:
- PA2: 10.0.1.10
- PA4: 10.0.1.20
Test connectivity with ping:
/ # ifconfig eth1
eth1      Link encap:Ethernet  HWaddr AA:C1:AB:49:55:B6
          inet addr:10.0.0.10  Bcast:0.0.0.0  Mask:255.255.255.0
...

/ # ping 10.0.0.20
PING 10.0.0.20 (10.0.0.20): 56 data bytes
64 bytes from 10.0.0.20: seq=0 ttl=64 time=15.378 ms
64 bytes from 10.0.0.20: seq=1 ttl=64 time=4.349 ms
...
🔍 Packet Capture
Edgeshark is available for packet analysis:
❯ cd /opt/edgeshark
❯ docker compose up -d
Using the VSCode extension, start Wireshark by clicking on Capture Interface:

