 2d8830960b
Remove emojis and em dash separators
Simplify introductory sentences
Standardize section headings
18 KiB
title, date, weight, cascade
| title | date | weight | cascade | ||
|---|---|---|---|---|---|
| VXLAN Automation with Netbox | 2025-04-02T20:00:00+02:00 | 3 |
|
Introduction
In this article, we're going to explore how to automate the deployment of a VXLAN infrastructure by relying on Netbox as our single source of truth (Source of Truth) and its "Render Config" feature.
The main idea behind this project is to simplify network configuration management by limiting the use of external orchestration tools, which can sometimes make inventory management more complex. We're going to show how Netbox can automatically generate the configurations for our network devices from Jinja2 templates, provided we respect one fundamental principle: standardizing our infrastructure.
To illustrate this approach, we'll use the example of a fictional site, "Paris", designed according to clear and precise standardization rules. This standardization will allow us to:
- Model the entire "Paris" site infrastructure in Netbox (buildings, customers, fabric).
- Generate the network device configurations based on the information centralized in Netbox.
- Validate the proper operation of this automated infrastructure using a NetLab lab environment running on ContainerLab.
Through this concrete example, we'll show that standardization isn't a constraint, but the foundation for successful automation and simpler, more efficient network management.
[!NOTE] CookBook All of the actions explained in this article are described here.
This article will not provide a step-by-step guide, but will provide links to the Cookbook, which does.
The concept of the standardized site
Effective automation of a network infrastructure relies on a solid foundation of standardization. To illustrate this principle, we've defined a standard site model, characterized by a precise structure and precise connectivity rules. Our "Paris" site will be a concrete instance of this standardized model.
Typical structure of a standard site
A standard site is defined by the following elements:
- A Central Server Room: Unique within the site, it hosts the fabric's two spines (Spine 1 and Spine 2), forming the core of the network infrastructure.
- One to Five Single-Story Buildings: Each building is dedicated to hosting a single customer (although the same customers can be spread across multiple buildings).
Each standard building is equipped with an access switch for local connectivity and a single leaf for connecting to the fabric.
Standard leaf connectivity
In a standard site, the connection of leaf devices to the spines follows these rules:
- Leaf Eth1 Interface: Always connected to the Spine 1 Eth1 interface.
- Leaf Eth2 Interface: Always connected to the Spine 2 Eth2 interface.
- Leaf Eth3 Interface: Always dedicated to connecting to the access switch present in the same building.

[!NOTE] Simplification for the POC For the purposes of this Proof of Concept, we opted for a simplified architecture without advanced redundancy at the leaf-spine connection level.
The main goal is to demonstrate automation based on this standardized structure.
IP addressing plan for the "Paris" site
For our "Paris" site, we'll use the following Netbox prefix containers, which fit into our overall addressing strategy:
- Location:
- Region: Europe
- City: Paris
- Prefix Containers:
- UnderlayContainer (Paris):
- CIDR:
172.16.0.0/16 - Description: "Container prefix for the Underlay network of the Paris site"
- CIDR:
- LoopbackContainer (Paris):
- CIDR:
192.168.100.0/24 - Description: "Container prefix for Loopback addresses of devices at the Paris site"
- CIDR:
- CustomersContainer (Paris):
- CIDR:
10.0.0.0/8 - Description: "Container prefix for customer addressing at the Paris site"
- CIDR:
- UnderlayContainer (Paris):
These "Container" type prefixes are specific to the "Paris" site and will be used by our automation scripts to assign IP addresses to the various devices and customers at this site, in accordance with the standard structure we've defined.
The "Paris" site: an instance of our standardized model
Our "Paris" site strictly follows the structure and rules defined in our standard site model. It will therefore include a server room with the two spines and can host up to five single-story buildings, each equipped with a leaf and an access switch, connected according to the established conventions. The IP addressing for "Paris" will come from the standard prefix containers we've defined.
This standardization is the key that will allow us to automate the creation and configuration of our "Paris" site infrastructure using the scripts we're about to present.
Test environment
The POC will run on ContainerLab, so it's necessary to refer to this article to easily reproduce the installation and the tools.
We'll be using:
- ContainerLab
- Arista cEOS for the switch/router part
- Netbox
- Plugin: netbox_topology_views
For more details, here's the installation documentation
Scripting: automation in action
Now we get to the heart of the matter: how we use scripts to automate the creation of our VXLAN fabric by relying on Netbox. We'll look at two main scripts that do most of the heavy lifting!
Step 1: preparing Netbox with import.py
Before we build our network, we need to prepare our "Source of Truth," Netbox. The import.py script is here for that! It will inject into Netbox the basic information for our "Paris" site and the models for our devices.
The Script's Ingredients:
Devices/devices_model.yml: The ID card for our devices (spines, leafs, access cEOS) with their characteristics (number of interfaces, types, etc.).IPAM/subnet.yml: The information for our "Paris" site (Europe region, city of Paris) and the plans for our IP address blocks (for the underlay, loopbacks, and our customers).
What the Script Does:
- It reads the
devices_model.ymlfile and creates the corresponding device types in Netbox. It's like registering the types of hardware we're going to use. - It reads the
IPAM/subnet.ymlfile and creates:- The "Europe" region and the "Paris" site.
- The IP address blocks we'll use for our network in Paris (our "container prefixes").
How to Fire Up the Machine:
Open a terminal and type the command:
uv run import.py http://localhost:8080 YOUR_TOKEN Devices/devices_model.yml IPAM/subnet.yml
Make sure to replace http://localhost:8080 with your Netbox address and YOUR_TOKEN with your Netbox API token! Once launched, this script lays the foundations of our automation.
Tip
Link to the Cookbook here
Step 2: building the VXLAN fabric with Create_Fabric/main.py
Now that Netbox is ready, we move on to building our network with the Create_Fabric/main.py script. This script will create all the devices, connect them, and assign them IP addresses, all while following our standardized model for the "Paris" site.
The Script's Steps:
- Ready check. The script starts by checking whether everything it needs already exists in Netbox (device roles, IP roles, device types). We don't want to start building on unstable foundations.
- Choosing the site: "Paris" of course. The script asks us which site we're working on. We select "Paris," our standard site. Its short name "PA" will be used as the base for naming our devices.
- Bringing out the spines (x2). The script creates our two spines in Netbox, using the correct model and the "spine" role. They're named
padc_sp1_00andpadc_sp2_00. - Leaf/access pairs per building. For each building in "Paris" (up to 5), the script creates a Netbox "location" and installs a leaf there (e.g.
pa01_lf1_00) and an access switch (e.g.pa01_sw1_00). - Automatic cabling. The script virtually connects the devices in Netbox following our rules:
Eth1of the leaf toEth*n*of Spine 1,Eth2of the leaf toEth*n*of Spine 2, andEth3of the leaf toEth1of the access switch. No more getting tangled up with cables. - IP distribution. The script draws from the "Paris" IP address blocks and automatically assigns IPs to interfaces (/31s for the links between devices and /32s for loopbacks).
- ASN assignment. Finally, the script assigns an AS number to each spine and each leaf for BGP routing. These numbers are stored in a special "ASN" field in Netbox.
uv run Create_Fabric/main.py
NetBox URL: http://localhost:8080
NetBox API Token:
Number of buildings (1-5): 4
Spine device type slug: ceos
Leaf device type slug: ceos
Access switch device type slug: ceos

Existing Sites:
  1. Paris (slug=paris)
Choose site number or 'new': 1
The result? By running this script, we end up with our entire "Paris" VXLAN infrastructure created and connected in Netbox, ready to be configured.
[!NOTE] Netbox Plugin The configuration can easily be visualized with the help of the plugin: netbox_topology_views

Tip
Link to the Cookbook here
Step 3: configuring our customers with Create_Fabric/add_customers.py
At this point, the fabric is functional, but no customer is configured yet. What does that mean? It means that the underlay – the foundation of our network – is configured in Netbox, and it's possible to generate a configuration to deploy BGP and configure the ASes. However, the access switches and leafs aren't ready yet to host users or customer services. There's no information in Netbox that allows for that yet.
In our standardized approach, each building is designed to host one "customer." A customer could be, for example, a specific team within the company or an external contractor. Each customer will be assigned a VLAN (and, in our VXLAN fabric, a corresponding VNI).
To perform this customer configuration, we use a dedicated script: Create_Fabric/add_customers.py. It will guide us step by step, asking for the VLAN and VNI to assign, as well as the building or buildings where our customers are based. Here's an example of it running:
❯ uv run Create_Fabric/add_customers.py
Enter NetBox URL: http://localhost:8080
Enter NetBox API Token: 4e58e40e6b19d7f6cc53ae5665ca7ddd00558e71
Enter Customer Name: Orange
Enter VLAN ID (1-4094): 10
Enter VNI ID: 10010

Available Locations:
0: PA1
1: PA2
2: PA3
3: PA4
Select locations (comma-separated indices): 0,2

❯ uv run Create_Fabric/add_customers.py
Enter NetBox URL: http://localhost:8080
Enter NetBox API Token: 4e58e40e6b19d7f6cc53ae5665ca7ddd00558e71
Enter Customer Name: Purple
Enter VLAN ID (1-4094): 10
Enter VNI ID: 10010

Available Locations:
0: PA1
1: PA2
2: PA3
3: PA4
Select locations (comma-separated indices): 1,3
Once this information is provided, the script takes care of automating several actions in Netbox:
- Creation of the tenant (representing the customer).
- Assignment of buildings (locations) to the tenant.
- Allocation of a /24 prefix for the customer's IP addressing.
- Logical configuration of the associated VXLAN/VLAN elements.
- Assignment of specific interfaces on the access devices for this customer.
Once Netbox is properly populated with all this customer data, it then becomes possible to extract the final, ready-to-use network configuration from it.
Generating configs with Netbox and Jinja2 templates
Now that we have our network inventory all set up in Netbox, how do we tell our devices how to configure themselves? That's where Render Config and Jinja2 templates come in!
[!TIP] Templates The templates used are available here.
Jinja templates: our configuration recipes
-
What are Render Configs, anyway? Imagine Netbox as a chef who has all the ingredients (our devices, their interfaces, their IPs, etc.). Render Configs are its way of turning these ingredients into prepared dishes, meaning configuration files for our network devices.
-
Jinja2: our recipe language. To write these configuration "recipes," Netbox uses a powerful engine called Jinja2, a bit like a simple programming language that lets us create dynamic configuration templates. We can put "holes" (variables) in them that get filled in with the information from our devices in Netbox.
-
A quick look at a recipe. Let's take an example of a Jinja2 template for one of our leafs:
hostname {{ device.name }}
{% if device.custom_fields.ASN %}
router bgp {{ device.custom_fields.ASN }}
    router-id {{ device.primary_ip4.address.split('/')[0] }}
{% endif %}
interface Loopback0
    ip address {{ device.primary_ip4.address }}
{% for interface in device.interfaces %}
interface {{ interface.name }}
    description {{ interface.description }}
    {% if interface.connected_interface %}
    no shutdown
    {% endif %}
{% endfor %}
See those things between double curly braces
{{ ... }}? Those are our variables! For example,{{ device.name }}will be replaced with the name of our leaf, and{{ interface.name }}with the name of each interface. We can even add conditions ({% if ... %}) and loops ({% for ... %}) to adapt the configuration. -
How Netbox prepares the dish. When we ask Netbox to generate the configuration for a device (say, our
pa01_lf1_00), here's what happens:- It looks up all the information about this leaf: its name, its interfaces, its IPs, its connections, its ASN, etc.
- It takes the Jinja2 template that we've associated with the "leaf" role.
- It fills in all the "holes" (the Jinja2 variables) in the template with the specific information for our
pa01_lf1_00. - And there you go! It produces a text configuration file ready to be used.
Tip
Link to the Cookbook here
From Netbox to the lab: doing it by hand for now
Now that we know how Netbox generates the configurations, let's see how we use them in our Containerlab lab.
-
Taking a look at the configuration in Netbox. To view the configuration generated by Netbox for a device, it's simple:
- In the Netbox interface, go to Devices.
- Click on the device you're interested in (for example, one of our leafs).
- And there we have a magic tab: Render Config! Clicking on it shows the configuration Netbox generated for this device using the Jinja2 template and its own data.
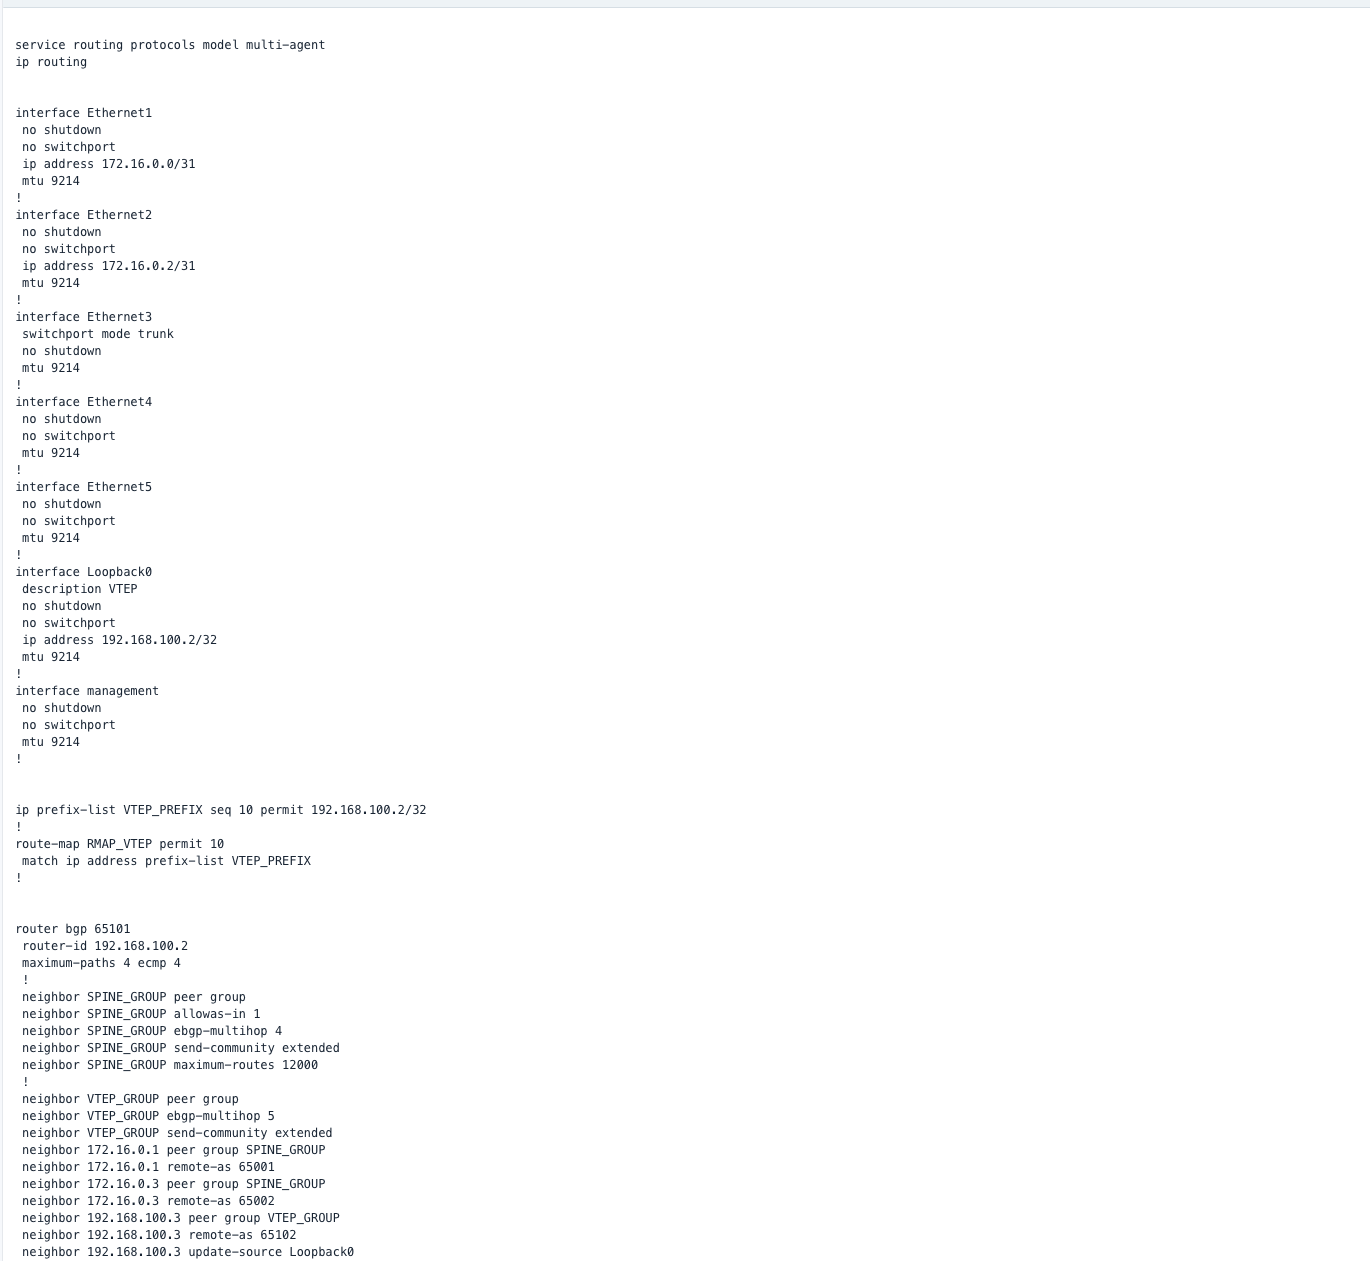
-
The human touch in Containerlab. For now, we don't have a script that automatically pushes these configurations to our devices in Containerlab. So we're going to do it the old-fashioned way (fine for a demo):
- We connect to each cEOS device in our lab via SSH (for example, using the Containerlab VSCode extension as we saw in the cookbook).
- We copy the configuration we viewed in Netbox (the Render Config tab).
- And we paste it into the cEOS device's command-line interface (in configuration mode, of course!).
-
What's next? This copy-paste step isn't the pinnacle of automation, but it's a first step toward seeing how Netbox can be our central brain. Down the line, tools like Ansible or NAPALM could connect to Netbox, retrieve these generated configurations, and apply them to our devices automatically.

Validating communication
Ping
In the cookbook, we chose to configure 2 customers each in 2 different buildings, which lets us run a ping. As a reminder:
-
Orange:
- Subnet: 10.0.0.0/24
- Hosts:
- PA1: 10.0.0.10
- PA3: 10.0.0.20
-
Purple
- Subnet: 10.0.1.0/24
- Hosts:
- PA2: 10.0.1.10
- PA4: 10.0.1.20
A simple "ping" lets us validate connectivity between the 2 sites:
/ # ifconfig eth1
eth1      Link encap:Ethernet  HWaddr AA:C1:AB:49:55:B6
          inet addr:10.0.0.10  Bcast:0.0.0.0  Mask:255.255.255.0
...

/ # ping 10.0.0.20
PING 10.0.0.20 (10.0.0.20): 56 data bytes
64 bytes from 10.0.0.20: seq=0 ttl=64 time=15.378 ms
64 bytes from 10.0.0.20: seq=1 ttl=64 time=4.349 ms
...
Packet capture
To go further, it's also possible to use Wireshark, which is available by default in the devcontainer, with the help of Edgeshark.
For more information, I'll point you to the article on My First Lab
And then, via VSCode, it's possible to launch Wireshark directly:


Conclusion
Netbox turns out to be a solid ally for automating the VXLAN network. The key is starting from a standardized foundation: that's what lets Netbox generate our configurations almost entirely on its own, using Jinja2 templates.
We're still copying and pasting the last step by hand, but centralizing all our information in Netbox is the first move toward simplifying network management and opening the door to full automation. Next up: deploying these configs automatically and handling more complex networks.